Geometry 8-B-2: Exploring Additional Resources

Usually, seventh graders are introduced to the Pythagorean Theorem by way of the formula only.  Not much geometric understanding goes behind it — they mostly view it as an algebra problem to be solved where the numbers to put into the problem come from a triangle.  In my web search, I sought to find resources that would help students understand the geometric meaning of the Pythagorean Theorem as well as give them practice finding missing side lengths.

What’s Your Angle, Pythagoras?  by Julie Ellis                                   

This book, while written for a younger audience, is a cute introduction to the story of Pythagoras’s discovery.  I would use it as a motivator and introduction to the concept.

The National Library of Virtual Manipulatives:  http://nlvm.usu.edu/en/nav/topic_t_3.html

This website has several activities about the Pythagorean Theorem that will help students visualize how the algebra and geometry work hand-in-hand.  (see my post Geometry 6-B-3 to view one of the virtual manipulatives)  IF you scroll down to the Grades 9-12 section, the two activities I found most helpful were Pythagorean Theorem and Right Triangle Solver.

Nova:  http://www.pbs.org/wgbh/nova/proof/puzzle/theoremsans.html

This is a lesson where students create the area of a square on each side of a right triangle with graph paper and then show how the areas are equal.  A great visual for showing the areas of the squares of the legs equals the area of the square  of the hypotenuse.

Pythagorean Triples Calculator:  http://www.cut-the-knot.org/Curriculum/Algebra/PythTripleCalculator.shtml

This is a fun interactive that generates Pythagorean Triples.  I would use it after teaching the concept and have students justify why certain side lengths will NOT work and what type of triangle is created when choosing numbers that do not work in the Pythagorean Theorem.

Additional Resources from classmates:

www.brainingcamp.com/resources/math/pythagorean-formula/

www.mathisfun.com

www.mathplayground.com/shape_inlay.html

Algebra 8-B-2: Reflections on Blogging

Describe your blogging experience in this course. Do you think you will continue using your blog? Why or why not?

I have to admit that the whole blogging process intimidated me at first.  It was new and confusing!  I am one who prefers a written manual when learning new things, but I am slowly getting accustomed to looking for a video on youtube for instructional help!!  Once I understood how to navigate the WordPress site and determined the best way for me to add new material and update previous material, it became a little more comfortable of a process.  I also needed to find a design that was aesthetically pleasing to me – the first one I chose just gave me a headache every time I needed to post something.  I finally decided on a more appealing one about three weeks into the process.  Once my blog page was appealing to MY eyes, it became a much more friendly place for me to visit!

 I don’t know whether I will continue to use my blog during the school year.  I have a dear friend who was working on her Educational Doctorate and created a blog with many educational perspectives on “hot topics” in education right now.  I really enjoyed reading her viewpoints and interjecting my opinion in the form of comments.  I just don’t know that I could find the time to do something like this on a regular basis.  My entire day is so consumed with school-related duties; I think I would find it difficult. 

 What did you learn about yourself and your abilities or interests in Math or Algebra?

I have been teaching Algebra in some way, shape, or form for the past 27 years.  I do not think I will ever tire of it, though.  This course taught me more about problem solving skills.  I am really glad this course was so technology-intensive, even though it challenged and frustrated me at times!  It forced me to learn how to do some of the technology that will motivate students.  I learned that you CAN teach a 48-year-old dog new tricks!!  I also learned that I still like to learn new things, and if given enough time and the right directives, it can be enjoying.  Every time I was frustrated, I thought of my students who are learning algebra concepts for the first time.  When you have been teaching the same basic concepts for so long, you sometimes tend to lose sight on how the most basic concept can be difficult for the students.  This course definitely reminded me about levels of frustration, and what helps someone get past the frustration to be able to handle the task at hand.

Did you learn or discover anything you found particularly interesting through your course activities or your own internet research? Describe one interesting discovery and why you found it fascinating.

I have been a member of the National Council of Teachers of Mathematics (NCTM) since my junior year in college (1983).  I have received every issue of one of their journals for all of these years.  I always read through the journal articles, and usually use some of the material in my classroom.  I often receive e-mails about their website and other internet based materials that are at my fingertips as a benefit of being an NCTM member, but never have I found the time to check all of that out.  The most beneficial discovery for me was learning of all the applets available online.  I had no clue all of those were on the NCTM website!  I have a SMARTboard in my classroom and I am looking forward to integrating the applets in my lessons this coming year.  The students will be able to go to the board and do anything I was able to do on the computer.  I think it will really enhance their learning and give them a new perspective on many topics.  I am taking the Geometry course offered by PLS simultaneously, and the one application I found most fascinating was applicable to both Algebra and Geometry.  It was the Pythagorean Theorem virtual manipulative  (see my Post:  Geometry 6-A-3:  Pythagorean Puzzles).  While I was working on it, I was using my algebra skills to verify the geometric situation.  I found this to be a fascinating activity because it was a visual example of how algebra and geometry are linked together and one supports the other.  Often times you hear people say “I’m not good at Algebra” or “I’m not good at Geometry” and they view them as two separate entities.  I think we as math educators need to bridge that thinking with activities like this that show the relationship between the two branches of mathematics.  I plan to use it in my Honors Algebra I class next year.

Do you think you will use journals with your students? Do you think you will use blogs? Why or why not?

I use limited journaling activities, but not a formal journal that the students keep all of their writing in.  I think it is valuable to have it all together and be able to reflect back on previous writings.  I think I will incorporate more journaling activities in the future; this year, as I teach, I will probably do what I have done in the past and re-evaluate where the best places in my curriculum would be to insert a journaling activity.  Then I will work with it over next summer.  I do have a student teacher coming in the spring, and I will encourage her to utilize journaling within her plans for the lessons.

As far as using a blog with my students, I would have to think long and hard on that also.  I definitely would not want it to turn into another Facebook-type social media outlet for them, so I would have to lay ground rules about posts and comments.  I’m sure they would pick up on it quite quickly! Another problem I had with it was checking other classmates’ posts – it was so cumbersome.  Maybe there is a better way to have a listing and be able to get to all the different sites quickly.  I have 28-30 students in five classes – that’s a lot of blogs to be checking!! 

Algebra 8-B-1: Factoring Quadratics

To factor a quadratic equation, you first must make sure the equation is set equal to zero.  This is done because the factors are leading us to find the x-intercepts, and the x-intercepts occur when the y-value of the ordered pairs is 0.  So, even though your equation may not have a y in it, you must bring all terms to one side of the equation and set it equal to zero.  If you are just factoring a quadratic expression, you need not worry about this, you simply factor the expression given to you.

For example, x2 + 5x = -6 must be rewritten by adding 6 to both sides, resulting in x2 + 5x + 6 = 0.  NOW you are ready to factor.

To factor a trinomial such as the one above, you need to “think backwards” and remember the process for multiplying binomials.  It is like a puzzle to figure out what numbers and variables will fit into the four “slots” so that when multiplied the result is the given trinomial.

Using the above example, you need to consider the constant first.  Where did that constant come from?  It was the result of multiplying the two constants in the two binomials.  So we must find numbers that multiply to the constant of +6.  But there are two choices:  1 & 6, or 2 & 3.  How do you know which pair, and which order?  This is the second piece to the puzzle.  When you multiplied the binomials using the FOIL method, the middle term was created when you combined like terms.  So we need to find the pair that combines to 5.  That would be 2 & 3.

Now you are ready to plug the values into the slots.  The “First” slots would multiply to give you the first term of the trinomial, so x & x.  The “Last” slots are the 2 and 3 discovered above.  Your factorization is (x + 2) (x + 3) = 0.  The commutative property also allows (x + 3)(x + 2) = 0 to be an alternately correct answer.

That one was pretty easy.  Now let’s try one a little more challenging.  Let’s try one with negative numbers in it.  To factor x2 -7x + 6 = 0, you need to follow the same procedure, and you still need to find numbers that multiply to 6, but now they must combine to -7.  We need to consider the factor pairs that have negatives in them:  -1 & -6 will multiply to +6, and -2 & -3 will also multiply to +6.  The first pair is the pair you need, because -1 + -6 = -7.

Your factorization would be (x -1)(x -6) = 0.

Now for one last challenge.  What if you were asked to factor x2 -5x -6 = 0?  Now you need factors that multiply to NEGATIVE 6.  This calls for one positive and one negative number in each pair.  This creates FOUR possibilities:

-1 and +6

+1 and -6

-2 and +3

+2 and -3
We need the pair that combines to -5.  That would be +1 and -6.  Your factorization is (x + 1) (x – 6) = 0

The process of factoring a trinomial is really nothing more than thinking backwards and figuring out the reverse FOIL puzzle.

Discussion questions:

Did paraphrasing the words help you internalize the concepts more?

To be completely honest, I have taught this concept so many times, I do not need to internalize it more.  That being said, I do believe the activity of paraphrasing (or journaling) about a procedure has its merits in terms of helping students to internalize the concept.   I will explain how I use this type of writing activity as an introduction to factoring using a game with a regular deck of cards below.  I believe having the students reflect on their thought process is a valuable activity and helps them internalize WHY they made the choices they did in solving the problem.

How can you apply this type of exercise in a lesson for your own students?

When I am ready to teach factoring trinomials of the form x2 +/- bx +/- c, I have the students pair up and play a card game, and then write about their findings and the patterns they discovered.  The game is simple.  The only supply needed per pair of students is a deck of regular playing cards with the face cards and jokers removed (with advanced students you could assign the values of 11, 12, and 13 to the face cards, but that adds a layer of thinking – I like to just stick with ace (one) through ten).  Red cards are negative numbers (think of the phrase being “in the red”) and black cards are positive numbers (“in the black”).  Shuffle the cards well.  Student A draws two cards from the pile.  Student A tells Student B what the product and sum of the cards is.  Student B must tell Student A what the two cards are. 

For example:  product is -32, sum is 4.  Answer:  Black 8, Red 4   (different colors produce a negative product, more positives will produce a positive result when combined.  +8 + -4 = +4).  Students record their results in a chart.  After each student has played ten rounds in each position, each student individually journals how to find the answer to the problem and what little “tricks” they learned along the way to guess quicker and more accurately.  The next day, I introduce factoring and equate it to the card game.  


Geometry 7-B-2: Archimedean Solids

This activity is an exploration of Platonic solids, Archimedean solids, and Euler’s Formula. 

The first Platonic solid I chose was the tetrahedron.  It has 4 congruent faces that are equilateral triangles, 4 vertices, and 6 edges:

This picture shows the places where the truncating will occur.

This is the result after truncating congruent triangular pyramids from each corner.  The resulting Archimedean solid is called a truncated tetrahedron and consists of faces that are four hexagons and four equilateral triangles, so 8 total faces.  The new figure also has 12 vertices and 18 edges.

The second Platonic solid I used is a cube.  The cube is made of 6 faces that are congruent squares.  It has 8 vertices and 12 edges.

This shows where the figure will be truncated.  Each truncated piece is a triangular pyramid.

The result is a truncated cube with a combination of 8 equilateral triangles and 6 congruent octagons for a total of 14 faces.  It has 24 vertices and 36 edges.

If I used this activity in my classroom, I would probably have several examples of the Platonic solids in my classroom for students to view.  Then I would assign each of the nets of the Platonic solids to take home and make.  I would instruct them to color it in bold colors and use either a glue stick or tape to secure the figure.  Gifted students would be given the more challenging figures to assemble (dodecahedron and icosahedron), while those with learning disabilities would be given the more basic solids (tetrahedron and cube).

When they returned to class the next day, we would complete a chart of the faces, vertices, and edges, working in groups.  Euler’s formula would be developed form these findings during the course of a whole-class discussion.   Then working in pairs, students would  speculate and journal what would happen if equal sized corners were cut off. Students would write in their journal what they think the new faces would be (and how many of them) and then also speculate about the number of vertices and edges by realizing similar occurrences at each cut.

Finally students would  measure equal distances on each edge from each vertex and mark the distance.  Then they would draw lines similar to those I drew above.  These are the truncating lines.  Then students would cut the corners and check their results with the journal predictions.  They would also find the number of faces, vertices, and edges on their new solids and determine whether Euler’s Formula was still valid.

I think some students will love this activity, especially those who are artistically inclined.  Perfectionists will be frustrated!  The solids are not easy to cut out, assemble, or truncate!  If solids are assigned carefully, and students are paired carefully, hopefully some frustration can be avoided.  The discovery learning in this lesson is a valuable activity worthy of the time the lesson will take.

Patterns for Platonic and Archimedean solids can be found at http://www.korthalsaltes.com/

Geometry 6-A-1: Tangrams Part 1

Image

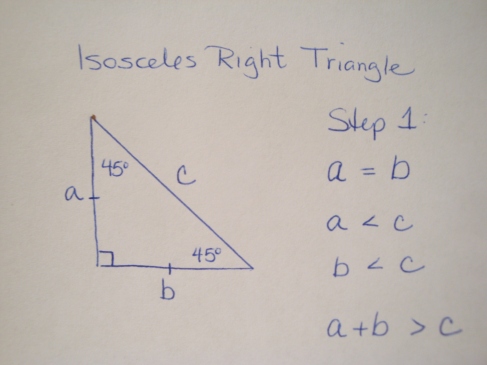
In Step 1, the red triangle was traced and sides were identified and related to one another.

Step two illustrates how the squares of the legs (4 red triangles) is equal to the square of the hypotenuse (1 yellow triangle equals two red triangles, so the two yellow triangles is equal to the four red triangles).

Step three shows the same relationship — the two yellow triangles are equal to 4 red triangles, and each blue triangle equals two yellow triangles, so the blue triangles could be replaced with eight red ones.  Again, the sum of the squares of the legs equals to square of the hypotenuse.

Step four shows how the squares of the legs would total four blue triangles (or 8 yellow, or 16 red) and the square of the hypotenuse is four blue triangles (or 8 yellow, or 16 red).

Step 5:  All of the above pictures prove the relationship between the squares of the legs of a right triangle and the square of the hypotenuse:

leg squared + other leg squared = hypotenuse squared

Students will see the substitution that can be made with the various shapes and be able to count triangles to show the equivalent values.  They will quickly make the connection between the sum of the squares of the legs and the square of the hypotenuse.

This is a great introductory activity.  Many combinations of shapes can be made with the 4 sets of tangrams provided.  The students could build on the fact that different shapes have related areas, and equal areas.  This is a good activity to introduce square roots because the side length is the square root of the area of the square.  Before beginning the activity, the teacher would have to define the side of the red triangle as one unit.  Then students can make connections between the side length and the area.  Students could create right triangles that were not isosceles by adding shapes to the triangular region.  An exploration of irrational values could result from this. This is also a great introduction to the 45-45-90 triangle relationships.

If I were to use this activity in my classroom, I think I would secure some hard plastic tangrams pieces.  I found the paper pieces difficult to maneuver, especially in the heat and humidity!  I would definitely have students work in pairs or groups and journal about their findings.  Before they moved on to the next step, I would have them PREDICT what they thought would happen, and then test their conjecture.  After discovering the Pythagorean Theorem, I would have the students each research a small part of Pythagoras’s history and discoveries.  Groups would then present their findings to the class and we would proceed to using the Pythagorean Theorem to find unknown lengths of sides of a right triangle.

Geometry 6-C-2: Bloom’s Taxonomy and the van Hiele levels of Geometric Thought

What level(s) of Bloom’s taxonomy most closely align with the level(s) of the van Hiele Model?  Justify your thinking.

Level 0 (Concrete) most closely aligns with Bloom’s Knowledge and Comprehension levels.  Students know definitions and basic facts about geometric figures and are able to identify certain shapes by name.  They can also perform basic calculations but do not necessarily understand WHY the rules to find the measurements hold true.

Level 1 (Analysis) most closely aligns with Bloom’s Application level.  Students are able to discover how shapes behave, and apply these discoveries to other similar situations.  Students are also able to compare attributes within a class of shapes, but not yet reason deductively about these attributes and properties.

Level 2 (Informal Deduction) most closely aligns with Bloom’s Analysis level.  Here a student uses previous knowledge and applies it to new situations using skills of comparing and contrasting attributes.  Students can also use informal reasoning to justify why certain properties happen.  This reasoning is based on prior knowledge.

Level 3 (Deduction) most closely aligns with Bloom’s Synthesis level.  Students are able to prove theorems using deductive reasoning.  Students further comprehend the geometric system and how properties and theorems work together to conclude further information about geometric situations.

Level 4 (Rigor) most closely aligns with Bloom’s Evaluation level.  The student can work in other geometric systems (like non-Euclidean geometry) and reason without concrete visual models.  Students can “think outside the box” and compare behaviors between the systems (how do parallel lines behave differently in various geometric systems?)

How can you use the van Hiele levels to help students learn mathematics?

The van Hiele levels help teachers make sure they are not only asking questions and teaching students at Levels 0-1.  It is very easy to slip into that mode and only ask students questions that require one right answer and not necessarily any higher order thinking skills, especially at the elementary and middle school levels.  Realizing the different levels in your own classroom will also help you to group students with varying ability levels so they can learn from one another.  All of this will help students learn mathematics and progress through the levels.

Additional questions I could ask if I used this activity in my classroom:

  • What happens to the perimeter when you place a tile in the upper left or lower right corner (or both)?  Why does this happen?
  • What shape could you create that has a perimeter of 16 and the largest possible area?
  •  Could you move the current tiles and increase the perimeter?  Decrease the perimeter?
  • What is the largest perimeter you could make with the tiles?
  • Can you move the current tiles to create an odd-numbered perimeter?  If so, describe how.  If not, explain why not.

Geometry 6-A-3: Pythagorean Puzzles

The following commentary is in reference to the following website:  http://nlvm.usu.edu/en/nav/topic_t_3.html

Scroll down to “Pythagorean Theorem” under grades 9-12.  The two puzzles are the topic of this post.

As I solved each puzzle and encountered visual difficulties, I found myself doing the algebra to find the areas of the shapes and prove to myself that the shapes would truly fit inside the white space.  Then I used lengths of sides and the fact that a-squared + b-squared equals c-squared  to help fit pieces together and make it work.  As I worked each puzzle I thought about how this would help my honors algebra students — not so much with the concept of the Pythagorean Theorem,  but with the idea of finding areas of geometric shapes with variable side lengths and using the concepts of polynomial multiplication and substitution to prove mathematically to a friend that the puzzle truly would work (I was ready to give up a few times!)  It also gives them another use for the Pythagorean Theorem and really illustrates the link between algebra and geometry.

The puzzles that gave me the toughest time were the ones where the square needs to be in the middle and slanted.  I always wanted to put it in the corner, but no matter which corner you put it, it did not work!  You would think after I did the first one that the second one would’ve come to me quicker; alas it did not!

I really don’t think there is a difference between the virtual vs. hands-on manipulatives, except for the fact that the virtual  setting only allowed me to turn shapes certain ways.  If I put the shape in an orientation that would not work, it automatically turned it back.  I think it would really depend on the availability of computer resources — otherwise I think they are equally effective.

Here are my solved puzzles:

Algebra 5-D-2: Applets

Exploring all of the applets available on these websites took lots of time!

ESCOT PoW Applets
http://mathforum.com/escotpow/puzzles/

Illuminations
http://illuminations.nctm.org

National Library of Virtual Manipulatives
http://matti.usu.edu/nlvm/nav/

Needing Java was also a challenge to figure out.  Once I had everything working and was able to look at and play with several of the applets, the one I found most useful for my teaching situation was found at

http://illuminations.nctm.org/ActivityDetail.aspx?ID=64

This activity is called Factorize and it does a great job of illustrating the connection between geometry and algebra.  Another applet (see below) factored polynomials, which would also be useful, but I think I would use this one first and more frequently because it helps students see how rectangles (and squares) are formed from the two factors.  This is very important to understand for future geometry topics.  Students also can never have enough practice with factoring.  This activity will not only set the foundation for deeper concepts requiring factoring knowledge, it also is a nice review of their multiplication facts.  The only downfall is that it only goes up to factors of 50.  That was disappointing.  I would like it to at least use up to factors of 100.

Another applet I liked, but could only use with one of the classes I teach, was a virtual Algebra Tile generator that asked students to factor polynomials by using the tiles to create rectangles.  Then the length and width become the factors.  I think the previously reviewed applet would be a must before using this one:

http://illuminations.nctm.org/ActivityDetail.aspx?ID=216

I would use the FACTOR feature all the way to the right (green tab) to help my Algebra students understand why a polynomial can only be factored one way.  The first applet showed how a NUMBER can be factored multiple ways, and that certainly has a place in this lesson as well.  As student manipulate the figures, they will see that a rectangle can only be formed one way, and you need to know the factors of the leading coefficient and the constant to figure it out. 


Geometry 5-D-1: Exploring Dilations

Dilations are a topic that students can readily relate to — I always like to use the example of enlarging things with a copy machine, but nowadays with all of the modern technology students are exposed to, many more possibilities for discussion exist.

In the article and activity Similarity and the Coordinate Plane  from Navigating Through Geometry in Grades 6-8, students can actually see that dilations enlarge and shrink a figure BY A CERTAIN VALUE.  This is important for them to understand that the value remains constant for all vertices to be dilated.

In doing this activity with my students, I would distribute a worksheet with the two original figures on graph paper and then provide an introduction to the activity.  Before the activity began, I would read the directions and ask students to write a quick sentence in their journal speculating what might happen to the shapes as a result of these directives.  Students would be directed to complete both activities and then compare their results with a partner to make sure their results are correct.  Then I would ask students to journal and answer the following questions:

How did your shapes change?

Compare the corresponding angles in the figures.  How did they change?  Why?

Compare the corresponding sides in the figures.  How did they change?  Why?

I think students will initially think the angles AND sides will be affected.  They may question why the angles don’t change after they do the activity.  This would lead to a nice discussion about angle sums of polygons and how they are fixed no matter the size of the polygon.  This will be a nice extension activity.  Another extension activity would be perspective drawing and vanishing points.  This could also lead to a discussion about limits.


Algebra 5-B-1: The Magic of Proportions

It is interesting that the topic of proportions comes up this week.  I have had several experiences with proportions in the hospital setting as my father-in-law is working hard to heal from his very serious fall.  I have listened to doctors and nurses adjust pain medication based on his weight, his oxygen levels, and his blood pressure.  I watched them calculate these proportions and then have a peer check to make sure the calculations were correct before administering the adjustment.  There is no lesson better to teach the importance of accuracy than when someone’s life is hanging in the balance and the wrong amount of medication could cause terminal results.  I plan to use this example (minus the morbidity of death, but definitely with the mention of how it could alter the patient’s progress) along with the peer check idea in my classroom for many activities next year.

Another everyday use of proportions came up the past couple of weeks at our subdivision swimming pool.  My husband and I are on the board of directors, and we’ve been having issues with the chlorine levels and trying to keep them at a constant level.  We have had to use proportions with the label on the container of dry chlorine to determine how much to put in the 50 gallon tank of water so the correct level of chlorine was distributed to the pool by the chlorine injector pump.  We also had to read the manual and calculate the correct setting on the chlorine injector pump so the tank would empty in a 24 hour period instead of faster.  I will also use this example in my classroom since many of my students live in our subdivision and it would be something they could take ownership in.